There are plenty of bike-related products trying to get a capital injection on Kickstarter, so when one takes off and doubles its project funding goal, it's probably going to be a winner. Cycliq got its initial funding from Kickstarter for the Fly6, bringing us the world's first integrated cycling camera and tail-light combination. They've now followed up with the Fly12, which simultaneously lights the way and records the activity in front of the bike - a front light/video camera combo with a swag of promising features.
RELATED: Best new bike accessories for 2016
Unboxing

Even before opening, Fly12 made a good impression. The packaging is nicely transparent so you can see the goodies inside, but more importantly it comes anchored to a hard-shell plastic protective case: there's no way it's getting damaged in transit. The other thing that grabbed my attention early was a sticker promising me 3 months free subscription to Strava Premium. Good start.
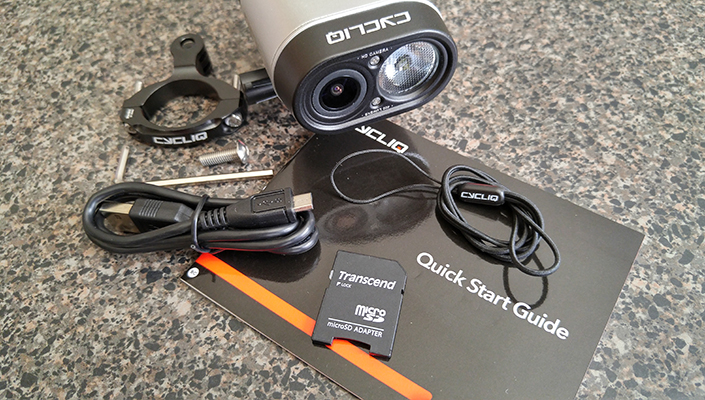
Inside the box is the Fly12 unit itself, a 6063 aluminum handlebar mount with both a hex-head screw and a wingnut screw, a hex key, a safety tether, and a tripod mount which can double up as a "selfie stick" mount. There's also a very brief quick start guide which doesn't provide much information at all. Better to go straight to the Cycliq website and get the full User Guide as a PDF.
First Impressions
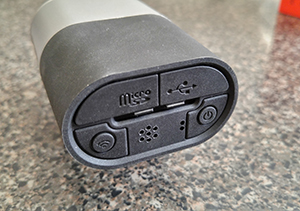
Fly12 is a nice-looking piece of kit. The rubber flaps in the rear to access the charging port and the micro-SD card slot are sealed brilliantly; it took some tweezers to get them open the first time, which gave me confidence in Cycliq's claim that the unit is completely weatherproof "utilising the latest nano technology." Yep, not water resistant, weatherproof. More on that later.
The unit comes with a 16GB micro-SD card, slightly on the small side considering it records 1080p video. This certainly won't present a problem for those riders using their footage primarily as a safety feature, but those who love to archive their videos or plan to use Fly12 to record epic holiday rides will need to upgrade and get a bigger card - Fly12 supports up to 64GB. Charging is via a micro-USB port located on the rear right-hand side of the unit.
For a piece of pretty high-tech equipment, it has surprisingly few controls: the on/off button and a Wi-Fi button, the micro-USB connection and charging port, and the SD card slot. It's neat and simple and looks good.
RELATED: 5 top bike lights for road and trail
Installation
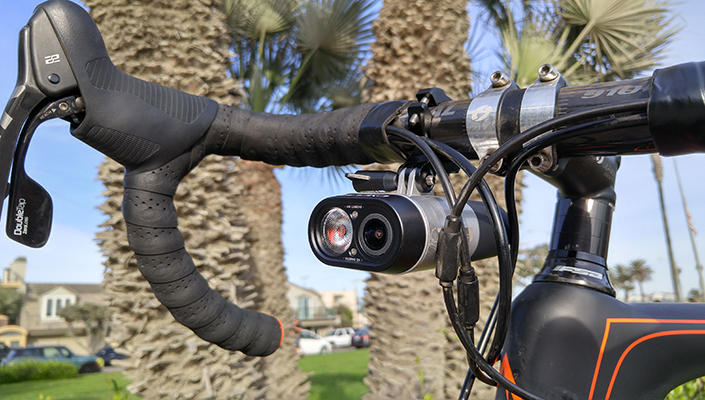
This is where I got excited. The double-bolt aluminum mount fitted nicely on the handlebars of my fatbike and it was fairly easy to find a spot that didn't interfere with cables. It's a different story on a road bike or TT bike, where there always seems to be a bit less room. The unit can be mounted above or below the bars; conventional wisdom seems to be to go above the bars on an MTB and below on a road or TT bike. The unit slots straight onto the triple-pillar mount, and once you tighten up the wing-nut screw it's locked in tight. It's a great design: solid, strong and absolutely unmoving - and so it should be, as a camera mounted on a shaky platform is of absolutely no use to anybody.
As mentioned earlier, the unit also comes with a hex-head screw rather than the wing-nut. The only advantage I can see for using the hex screw is that it might be harder for somebody to steal the unit from your handlebars, but in that case they might just try to steal the entire bike. The wing-nut tightens beautifully, holds the unit absolutely securely, and is easy to take on and off.
Operation
At this point it was tempting to hit the "On" button and head out to the trails, but I took a deep breath and read the User Guide instead. This convinced me to download the CycliqPlus app first, and that turned out to be a good move.
All of Fly12's settings and configurations are available through the app - everything from video resolution to light modes to reviewing and editing videos. It's not necessary to start with the app - the Fly12 will perform regardless - but some users might want to tweak settings immediately. I browsed them, but ended up leaving them at their defaults.
I used the iPhone app and the download and integration was very straightforward and simple - the Android app, however, is still in beta phase, and all reports indicate that it's not nearly as user-friendly.


Screenshots from the CycliqPlus app - iPhone (1,2) and Android (3-6).
With the app installed, I hit the trails and rode straight into a downpour. Determined to test the waterproof-ness of the unit and see how the footage looked in the rain, I pressed on.
Switching the unit on is as simple as holding down the on/off button for about a second. If the unit is mounted above the bars it's easy to see the LED light indicating the unit is operating properly, but this is not the case when mounted under the bars. In no time, I was confident enough with the operation to switch it on whilst on the move and trust that it was working.
Marcus takes Fly12 out on a family bike ride. NOTE: He forgot to save the full resolution video (1080p), so the poorer video quality here is from a file saved with lower resolution and aggressive compression.
RELATED: Wet weather survival guide
On that note: as soon as Fly12 is turned on, it immediately starts recording. You can turn the light on or off, but you can't ever turn video off. Remember, Fly12 came to life as a safety feature, and part of the deal is that it records everything that happens in front of your bike.
The light, capable of beaming out 400 lumens, offers great visibility and comes with nine settings in various levels of brightness in solid, stutter blink and steady blink mode.
Fly12 nighttime video.
Getting back to the rain: I got soaking wet, as did the Fly12, but it worked just fine. Since then I have also inadvertently dropped it into seawater, and it's still working, so I can vouch for the fact that it really is weatherproof, though Cycliq advises not to go diving/swimming with it.
Rainy mountain biking with Fly12 (downsampled video).
Fatbiking with Fly12 at the beach (downsampled video).
Footage
There are three ways to view your video footage: by connecting to a computer via the Micro USB cable, by inserting the MicroSD card into a device (computer, smart TV, etc.) that can read it (a MicroSD to SD adapter is included) or by using the free Cycliq app. In my opinion the app is definitely the best option: it offers the ability to view video footage, it's by far the easiest way to change configuration settings, it lets you edit and share videos, allows you to add Strava and tramline overlays AND all this can be done without removing the unit from the bike.
The app connects your smart phone to the Fly12 via a combination of Bluetooth and Wi-Fi, using Bluetooth to help with configuration but then deferring to Wi-Fi's superior bandwidth to assist with video streaming. Once your phone makes a connection with the unit, either a blue or green light will appear on top - blue for Bluetooth, green for Wi-Fi. The instructions within the app are well thought-out and very clear.
Once a connection is established, you simply tap the Review Footage option: if the unit is still operating with a Bluetooth connection it will automatically switch to Wi-Fi. From here you will see 5-minute sections of video footage at the bottom of the screen. Select a particular video, press Play and away it goes. The chunks of footage, rather than one huge file, make it much easier to select a certain segment of your ride that you might want to watch. It saves a lot of time.
The quality of the video itself is great - very sharp and clear. Because the unit can be mounted either above or below the handlebars, it automatically orients the footage so it never appears upside down, whichever mounting option you choose.
(One of our test units didn't auto-orient footage at first, but a 'Master Reset' as listed in the Quick Start Guide was all it took to get it right thereafter.)


Screenshots of video reviewing and editing using the CycliqPlus iPhone app.
Editing
Video editing is easy. Pick a clip, drag the scrubbers to select a segment and then hit Save. It's a simple matter to add tramlines to your footage to identify vehicles that infringe upon minimum passing distances. Equally simple is the ability to overlay map data and ride metrics from Strava, although I found this took a long time to get right. In my case, the app was failing to recognize that I was already logged in to Strava, but after having spoken to other Fly12 users it seems everyone else was able to use it very easily indeed, so I'm assuming this experience was unique to me.
Fly12's full HD video with tramlines and Strava overlays. Unfortunately, map overlay is not part of the Beta release of the Android app.
Fly12 has an internal microphone with 48KHz sampling rate, AAC compression, and auto gain control, which should mean it has excellent audio quality. This is definitely the case when standing still, but the audio that accompanies riding footage (which is really why anyone would buy the Fly12 in the first place) is quite hampered by wind, bike, and traffic noise. It's better on the trails, especially on trails sheltered from wind, but it's still not brilliant.
Fly12 HD video of a casual road ride by the beach.
And it also does this...
Just like its older brother, Fly6, the Fly12 has an "incident protection" function. Tilt the camera past 60° for more than five seconds (which is obviously what happens when a crash takes place) and it will automatically record for 30 more minutes, then power down to protect preceding and post incident footage. This feature is on by default, but can be turned off as needed.
There is also a second, manually operated incident protection feature. If a rider witnesses an incident - maybe a fellow rider getting clipped by a car - pressing the Wi-Fi button locks the current 5-minute file as well as the previous file, thereby protecting the footage in both files and preventing them from being over-written if the camera is still in use.

With Fly12's smart alarm, you can feel safer leaving your bike outside while you get coffee.
If you love a coffee during or after a long ride, but are riddled with worry about letting your precious bike out of your sight for even a second while you place your order, you can rest easy. The Fly12 comes standard with an alarm system, whereby if your bike is moved a warning tone will sound and the light will start flashing. It only works, though, if the device you use to run the app (your phone, in most cases) is within Bluetooth range (typically 20-30 feet); if you're close enough for that you can probably see your bike anyway. Assuming you're within range, but have your back turned and a felon or clumsy pedestrian moves your bike, the lights on the unit will flash, the alarm wails, a notification is sent to your phone, and the camera begins recording.
The good and the bad
As expected for a unit of this size and with all those features packed in, Fly12 is pretty heavy. My unit weighed in at 276 grams, nearly 10 ounces, including the mount and wing-nut thumbscrew - not brilliant, but not too bad when considering it's a 400 lumens headlamp and video/audio camera combined. Compare to a GoPro Hero5 (144g) plus a Lezyne Micro Drive 450XL front light (99g), and you're pretty much in the same spot for added bike weight, but without yielding double the handlebar space.
The headlamp itself provides plenty of illumination for riding, but it doesn't translate very well to filming at night. The resulting footage is OK, at best, and is nowhere near the crisp quality the unit delivers in the daytime.
As mentioned earlier, the 16GB MicroSD is great for using right out of the box, but is likely to be too small and should probably be replaced with a bigger one straight away.
The iPhone app works perfectly, but the Android app, still in beta phase, is clunky, awkward, and just not quite right; the final release and future versions should be much more functional.
Unfortunately, there is no way of pairing footage from Fly6 and Fly12 together. It would be lovely to be able integrate them, but we understand the Fly6 is not a wireless-connected device, so it's probably going to prove too difficult.

As there is no viewfinder or screen, there is no easy way to check the field of view for the camera. However, the ultra-wide angle lens is very forgiving, and given that the unit is pointing forwards and is reasonably level, it will capture most of the scene.
On the big plus side, Fly12 is very easy to use - it powers up and starts recording by holding down one button. Being an integrated video camera and light, the unit is first and foremost a security device to record what happens when you ride and to help you see and be seen, and it performs these tasks faultlessly.
Video editing is clean, quick, and very easy, as is the visual overlay of tram tracks or Strava data. The videos themselves, broken into convenient 5-minute MP4 chunks, are very high quality when shot in daylight. A few extra button presses in the app and you can share your clips to your favorite social media.
Looping recording is so convenient - set it and forget it. You don't have to manage or edit your videos if you don't want to - as long as your unit is charged, just turn it on and ride.
The mounting system is superb; strong and durable fastenings mean your Fly12 will record high-quality video from a steady platform and will stay on your handlebars regardless of the terrain. So confident am I in the integrity of the mounting system that I don't even bother with the safety strap that came in the box.
Finally, if you do run into any hassles with Fly12, Cycliq have an excellent support forum that will almost certainly have the answer to your problem. If not, contact them direct and they'll help you out. They're good people with a very good product.

Enter to win
1 of 3 Fly12
HD video camera + bike light combos
valued at $349 USD each!
Click Here to Enter to win!
Learn more about the
Cycliq Fly12.
RELATED ARTICLE:
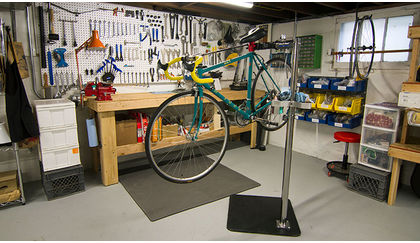
Save money by setting up your own home bike workshop
If minor repair bills are starting to sting, try setting up your own workshop! BikeRoar gives you some tips on how setting up a home workshop can save you... READ MORE

RELATED ARTICLE:
Most Innovative Bike Components of 2016
2016 was a good year for big breakthroughs in the bike industry BikeRoar selected the most innovative... READ MORE