
Setting up the suspension properly allows you to ride to the limit of your bikes abilities.
Setting up your suspension correctly can increase your riding speed dramatically. This is due to increased bike control from a properly functioning damping system: In short, a suspension setup that suits your weight and riding style. Not many people are willing to tamper with their fork or shock, but it could pay off to have a basic understanding of how to set up your suspension.
We assume your weight won't change dramatically over the next few months, but what about your riding style demanding a different suspension setup, or even the terrain you ride... Curious yet?
How much you weigh plays the biggest role in setting up your suspension (for both hardtail and dual suspension bikes). Before you get started, get all your riding gear on - from your camelbak to your shoes and helmet. This can add an additional 3-4 kg to a rider, so make the effort. Now grab a suspension pump (a.k.a 'shock pump') and let's get started.
Starting at the very beginning? Read "Guide to mountain bike suspension: An explanation of terms" for a glossary of suspension jargon.
THINGS YOU'LL NEED
- Tape Measure
- Shock Pump
- The Bike
- Zip Tie
- Calculator
NOTE: This article is in reference to air suspension, and not basic coil sprung shocks. Unfortunately base model suspension is not as adjustable as mid-range to high-end suspension. Enquire at your local store about an upgrade though, and then read this!
REAR SUSPENSION SETUP
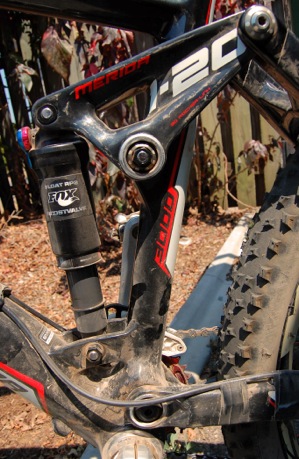
- You need to determine the stroke length of your rear shock if you have one, but if you ride a hardtail bike then just skip this step. (Some manufacturers provide this information with the bike so check any manuals you have). First, measure from one end of the shock to the other, eyelet to eyelet. Write that measurement down, and then completely deflate the rear shock and weight the bike till it bottoms out. Measure the eyelet to eyelet distance again, and then subtract the second measurement from the first one you took. This is now your 'stroke length' so write it down and reinflate your rear shock.
- If your rear shock does not have a rubber O-ring around its shaft, then use that zip tie you have, and tie it around the shaft of the shock. Slide the O-ring or your zip tie all the way up to the seal and lean your bike against a wall. Slowly get onto the bike without bouncing it around. Sit down slowly in a normal riding position, and then slowly get off the bike again. What you're trying to do is measure your suspension sag, which is the central measurement to suspension setup.
- Measure the distance from your shock seal to where the O-ring has been pushed to. This is your sag and needs to be figured out as a percentage. So write that distance down, from the seal to the O-ring, and get your calculator. To figure out your percentage sag, do the following: Multiply the shock stroke length by the percentage of sag you want. So for 25% sag, you'd go - stroke length x 0.25 = 25% sag. Compare this with your sag measurement and adjust.
25% is the recommended percentage for cross country. Downhill riders and the like could be looking at up to 30-35% sag. A big difference!
To increase suspension stiffness, you'd look at increasing the pressure within the shock. So if your sag was too much, connect your shock pump and add 10-15 PSI at a time. (You lose about 5 PSI when you disconnect the shock pump, so count for that as well). To increase sag, you'd need to decrease stiffness - reduce the shock pressure 5 PSI at a time.
Rebound

Fork rebound knob
You might be wondering about suspension rebound speed... This is something that you can experiment with, as there are no set measurements or parameters regarding this setting. So hit the trails, and try both ends of your rebound range - you can't break anything so just play around with your rebound dial until you figure out what works for you.
Fast rebound (-) means the shock returns to full extension much quicker - too fast, and the bike is over active in the rear end.
Slow rebound (+) means the shock takes longer to fully extend, giving a more gentle ride - too gentle, and the shock feels dead.
Further reading: New to dual suspension and want to know more? Read "A beginners guide to mountain bike suspension
FRONT SUSPENSION SETUP
Front suspension setup is as easy to master as the rear shock, so get all your tools together as listed above, and get started.
- Following similar to step one determine your front suspension stroke length. Place a zip tie around the stanchion (the shaft that goes in and out of your front shocks - either side, it doesn't matter). Completely deflate your fork, and depress it to see where your zip tie gets pushed to. Reinflate your fork, and measure from the dust seal to where the zip tie is. That's your maximum travel length.
- Determine the sag measurement by getting onto your bike, and sitting in a natural position. Slowly get off the bike, and then go about measuring your sag reading from the dust seal on your front suspension to where the O-ring has been pushed to. This is your sag measurement, so figure it out as a percentage again. To do so, follow this: stroke length x 0.25 = 25% sag. For downhill bikes, you'd again be looking at 30-35% sag measurements. If the measurement you came up with is not 25% sag, then grab your shock pump and inflate or deflate your fork as needed.
If you're riding a dual chamber front fork, then you'll be increasing air pressure in the positive chamber, marked with a + sign on your forks. If this does apply to you, then also spend a little extra time reading your owner's manual or find further shock specifications online.
Last of all, and probably the most important step in suspension setup - write your measurements and air pressures down! It allows you to see what works and what doesn't, without having to go back to step one and start all over again!
Good luck!