 Adjusting a rear derailleur is an important skill to master. There are few things more annoying than a clicking drivetrain; the sound of a chain that just can't decide which gear it's meant to be in.
By following these simple steps, and with a bit of practice, you can tune your own derailleur with confidence and save some time and money at the LBS!
TOOLS:
- Two hands, preferably with 5 fingers on each
(you can do it with less if necessary) - Philips head screw driver
- Allen keys
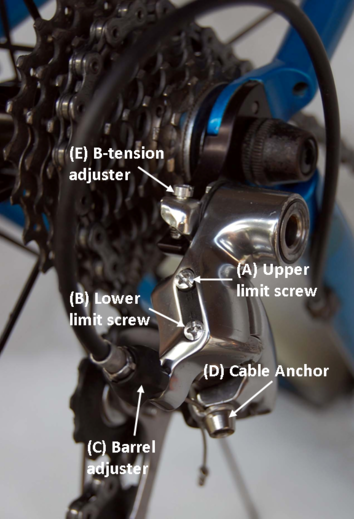
1. Setup
Shift the chain into the smallest cog on the rear cassette. Turn barrel adjuster (C) all the way in (clockwise) to release tension on the cable.
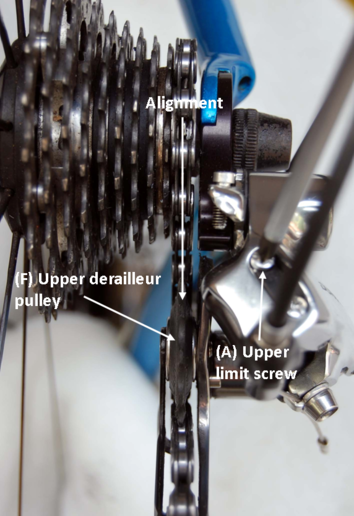 2. Adjust upper limit
Adjust the high limit screw (A). Turning the screw moves the derailleur inward and outward. Position it so that the top derailleur pulley, or jockey wheel is directly below the smallest cassette cog, then nudge the screw again to move it just a smidge outward.
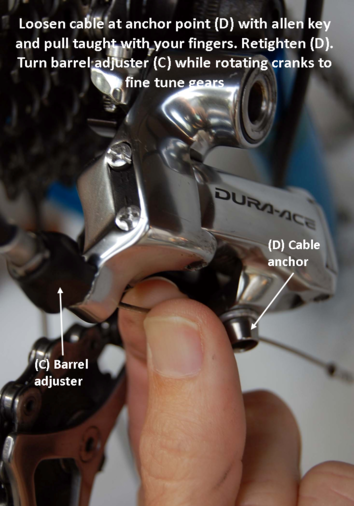 3. Adjust cable tension
Loosen the anchor screw (D) with an allen key (this will be a 5mm (or 3/16) allen key on a Shimano derailleur), pull the cable taught with your fingers and retighten the anchor. Now to adjust the indexing which determines the accuracy of the chain when changing between gears...
At this stage the chain won't slot into the gears very precisely when shifting up and down the cassette. Begin by turning the barrel adjuster (C) anti-clockwise to add tension to the shift cable and rotate the cranks while shifting between gears.
You should start to see the chain slotting into gear more smoothly and precisely. Play around with the cable tension until the chain moves smoothly up the gears and drops back down without hesitation. This sounds easy, but can take some time to master.

TIP: Put the chain into a cog half way along the cassette and align the jockey wheel using the barrel adjuster. With the jockey wheel, chain and cog aligned here the rest of the gears should follow.
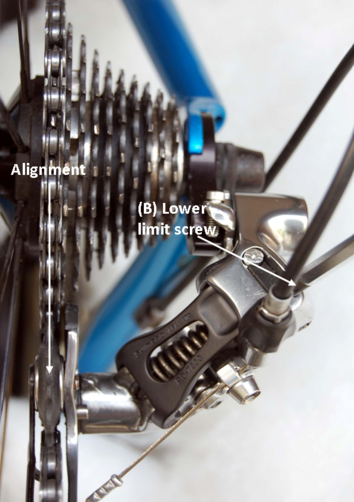 4. Adjust lower limit
Move the chain into the largest cassette cog. Vertically line up the top jockey wheel with the largest cog by turning the lower limit screw (B). Test by shifting between the lowest two gears to make sure the chain is staying in the big cog cleanly and that the derailleur can't move across into the wheel spokes.
5. Adjust B-tension
Often this adjustment is only necessary if you have swapped to a cassette with a larger cog (for example: 25t cassette swapped for a 27t cassette). With the chain still in the largest cog, adjust the B-tension screw (E) so the derailleur sits close to the cassette without touching or bouncing off when the chain is rotating.
NOTE: These adjustments assume an undamaged, unworn drivetrain. If after following these steps there are still issues with your gears it could be any number of factors ruining your day. Some notable problems include: A bent derailleur hanger, a worn cassette and/or chain, a "hot" link, old or dirty cable inner and outers...if unsure, see your bikeshop.
If all goes well you should now experience crisp, clean gear changes. It may take some trial and error to start with, but with some practice this is an easy job for the home mechanic.
Any questions? Drop a message to the BikeRoar crew in the comments, or visit your LBS.