Don't let a puncture ruin your ride.
Ok, the inevitable has happened: you are riding along, minding your own business and doing something great for yourself and the environment when "BANG" -- you have a blowout, flat, puncture.
Now, if you are prepared, have the tools and spares you need to fix it, and have read our basic tutorial, you will be well prepared to get yourself back on the road.
If you haven’t done your homework, then hopefully you are close to home or have a mobile phone!
Initial tips and tricks:
- The first safety step is this: if your front tyre gets a flat, do not turn your handlebars sharply. You lose the ability to steer when you lose your front tyre pressure, so be sure to keep your front wheel straight as you slow to a stop.
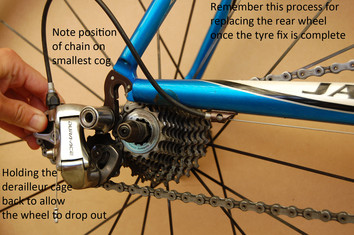
- As you are slowing, shift your gears, if possible, to the smallest cog on the rear and to the largest front chainring. This is only for those who have a rear-tyre flat as it will aid in removing the wheel from the bike when the chain is lined up.
- Once you have stopped safely, remove yourself and your bike from the road. Find some shade away from the road to work on your tyre.
- Your saddle bag (or pannier, backpack or messenger bag) should be stocked with a spare tube or two, a set of tyre levers, spanner(s) to fit your wheelnuts (if applicable), a basic patch kit (traditional glue and patches or the new "speed patches") and either a CO2 cartridge inflator or a minipump to inflate the new tube.
Front Wheel
- Open the brake caliper's quick release feature - Shimano/SRAM brakes have a lever on the left side of the brake body which you rotate to open, while Campagnolo brakes have the quick release (a small pushbutton) on the brake's hand lever. For mountain bikes with cantilever or V brakes, unclip the brake's straddle wire from the brake itself (there's usually a slot to remove the wire). In the case of disc wheels, simply move onto step 2 below. A word of caution for those of you with bikes equipped with hydraulic disc brakes: try not to depress the brake lever when the wheel is out of the frame. Resetting the pads can be a tedious process and is beyond the scope of this article.
- Undo the wheel with either the hub's quick release skewer or with a spanner on the axle nuts, depending on what type of setup you have.
- If your fork has "lawyer lips" (small retention nubs on the fork's dropouts), you may need to unscrew your quick release skewer a bit to allow the wheel to come out.
- Remove the front wheel from the forks.
Rear Wheel
- Open the brake caliper in the same manner as the front wheel.
- Undo the wheel with either the quick release lever or spanner.
- When the axle is loosened, the wheel will want to fall out. You may need to pull back the derailleur cage to allow this to happen. Remember, have the chain sitting in the smallest rear cog before attempting to remove the wheel.
- Place your bike on its side, chainring side facing upwards.
A pet peeve of ours is to see people putting their bikes upside down, resting on the levers and saddle. C'mon, people…you're going to scratch things up!
Getting the tube out of the tyre and off the wheel
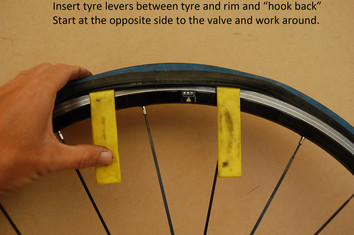
- Insert one tyre lever in between the side of the tyre (the "bead" that hooks into the rim itself) and the wheel rim.
- Clip the tyre lever against the spoke with the hook end (if your tyre lever has a hook...the one in the photo example doesn't)
- Now insert a second lever around 10cm further around from the original lever.
- Repeat with the second lever all away around the tyre. Eventually the tyre will loosen enough that one side will come easily away from the wheel rim.
- The bead of the tyre should now be exposed all around one side of the rim.
- Remove the tube from inside the tyre.
- Carefully inspect inside and outside of the tyre for what caused the puncture. Take care, as there may be glass or a nail still embedded in the tyre, which could cause you a nasty injury. Feel gently with your fingers while you observe the tyre for any sharp bits and remove them as necessary.
- Partially inflate the new tube (just a few puffs with the pump) and insert the valve into the hole in the rim.
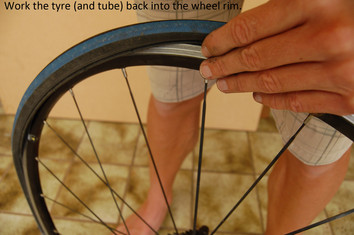
- Work the tube into the tyre with your fingers, being careful not to pinch or crease the tube as you do so.
- Re-seat the tyre's bead onto the rim. If you can, try to do this step with hand pressure alone, slowly working your way around the tyre until the bead is seated. For tight-fitting tyres, you can use a lever to seat the last few centimeters of tyre bead, but be careful not to pinch the new tube.
- Once you have completed that, partially inflate the tyre and then spin it to ensure that there are no bumps in the tyre. Check the wheel over and look for any parts of the tube trying to escape from under the tyre's bead. If there are lumps or protrusions, you will need to deflate the tyre to correct where the tube is caught up between the rim and the tyre.
- Now that you have that sorted, inflate the tyre to your preferred pressure (usually close to the tyre's maximum pressure).
- Fit the wheel back into your bike, tighten the quick-release skewer or axle nuts, re-attach your brake wire or close the brake's quick release lever, place all of your tools and the old tube back into your bag and you are now ready to roll.
- Congratulations! You just successfully changed a tube out on the road!