Adjusting a front derailleur can be frustrating for someone new to cycle maintenance. Yet, as shown in "Adjust your rear derailleur in 5 steps", with a bit of practice, derailleur adjustment is a process that can be easily learnt.
TOOLS:
- 4 or 5mm hex key
- Flat or Philips head screw driver
1. Check cables
Prior to any gear adjustment it is a good idea to check the gear cables are intact, free from dirt or grit and can run smoothly through the outer casing. Keep an eye out - we will be covering "how to clean your gear cables" soon.
Many gear issues begin with dirty cables and outers so it is a good idea to check them before attempting to adjust your gears.
 2. Adjust derailleur alignment
Loosen the collar clamp that holds the derailleur to your seat tube (this is a screw on braze-on derailleur). Now adjust vertical position. Move derailleur cage so that there is a 1-3mm height gap between the front chainring teeth and the outer cage plate.
Partially tighten the band and check the angle of the cage - this should be close to parallel to the front chainring. Once set fully tighten the clamp.
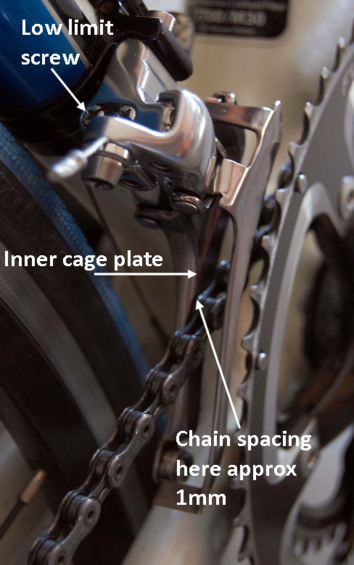 3. Set Low limit screw
Shift the chain into the largest rear cassette cog and smallest front chainring. Use the screw driver to adjust the low limit screw. You want a gap between the chain and inner derailleur plate of approximately 1mm.
This will prevent the chain rubbing in the outermost position and will also stop the chain coming off.
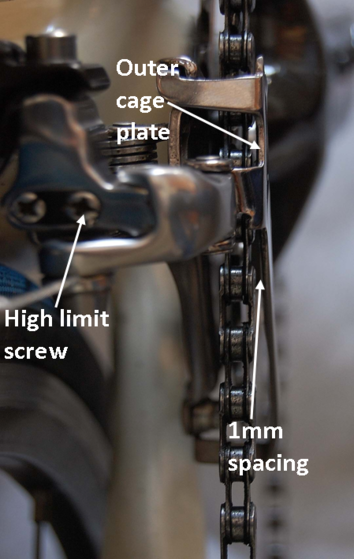 4. Set High limit screw
Shift to the smallest rear cog and the big chainring. The high limit is set up similarly to the low limit, but on the opposite side. The gap between the chain and the outer derailleur plate should be set to no more than 1mm.

TIP: At this stage your cable may not be taut enough to pull the derailleur cage over far enough when setting the high limit. To check the limit, grab the cable where it runs down the down tube in your hand and pull. You will see the cage move across as far as it is able. You can now adjust the high limit to the correct position.
5. Adjust cable tension
Loosen the anchor bolt with your hex key and pull the cable taut with your fingers, retighten the anchor bolt. (This is the same as in setting up your rear derailleur). Check your adjustments by shifting through the rear cassette first with the chain in the large chainring, and then the small. Ideally there will be no rubbing through the range of gears.
If there is still rubbing, fine tune the cable tension with the barrel adjuster (if available).
Hopefully your front derailleur is now shifting precisely and not dropping the chain!
Any difficulties? Share your troubles with BikeRoar and hopefully we can help!